   Depending upon the context, "shooting from the hip" can take on one of several meanings. In my case, it refers to the practice of taking photographs while your camera dangles from your hip. Or in front of you. The main point is that you don't hold your camera up to your eye, carefully compose your shot, or check the results. You just randomly click the shutter button and take what you get.
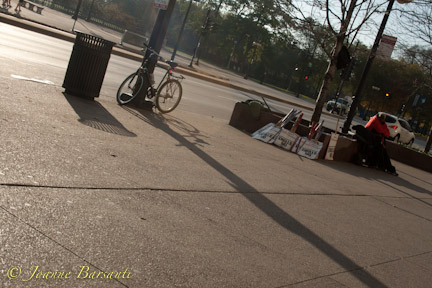
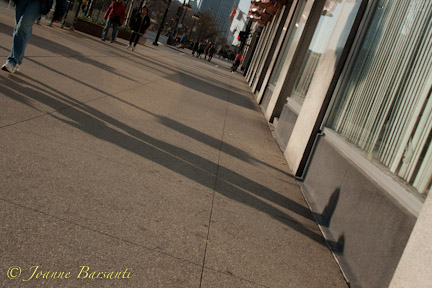
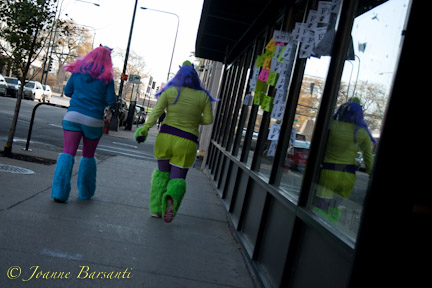
Shooting from the hip is pretty spontaneous, which is not my style - I usually like to everything organized and planned out ahead of time. Normally I shoot in manual mode, which involves checking exposure and adjusting as needed. Street photography (not my style either) is particularly suited to shooting from the hip because of the variety of scenes that present themselves and the constant change in what comes into view. There is a surprise factor in letting the camera capture the randomness of people, scenes, shadows, and random objects that one would not normally notice. So, last October, when I was in downtown Chicago for the Filter Photo Festival, I decided to try my hand at shooting from the hip. It was fairly early on a Sunday morning, and at first there wasn't a lot of activity, not even from the picketers in front of the Sheraton Hotel on Michigan Avenue. But then, there appeared a trickle of people in all manner of costumes, moving towards Grant Park for the Chicago Monster Dash. The idea is to run either a 5K or half-marathon in your favorite costume. If you don't do well on the racing part, there are prizes for best costume based on originality, execution, wearability and overall effect. Perfect! Early morning sunny day, fresh and crisp, a fun atmosphere, and unusual subjects. Set the camera to aperture priority, let the camera hang at an angle at the hip, and click away.
1 Comment
Last week I talked about different styles of work flow depending on the camera and purpose of the images. Where my iPhone and Point-and-Shoot images are concerned, ‘Work flow for Fun’ rules the day: simple, low-risk, minimal post-processing. The goal is to get the images out there where they can be shared, and move on to the next thing. If the images get lost or deleted afterwards, it is no big deal. They have served their purpose. Sometimes I am asked to retrieve an image or a series, but that doesn’t happen often. Yes, I still save these images, but if they were lost, it would not be a big deal.
It is a different story with my ‘serious’ work - all the elements of work flow come into play when it comes to images produced on my DSLRs. The images are much larger, there is more post-processing, and the risk-reward dynamics of losing something become more significant. I may never go back to images that I took two or three years ago, but I still want the comfort of knowing they are there and that I can find and retrieve them easily. In theory, a work flow should look something like this:
I follow most of those steps, and for the ones that I don’t follow, I am keenly aware of the risks. After putting down my thoughts, I will be re-visiting the areas that are lacking, and coming up with new ways to fill in those gaps. As I examine my workflow, I find myself asking the questions “Why am I (still) doing that?” or “Why am I NOT doing something?” and “Is there a better way at this point?” In practice, here is what my workflow looks like: 1. Download images from camera Since I use a MAC (MacBook Pro) and I like to have control, I use the Finder Utility to drag and drop from the memory card to computer. I have folders set up by year, month, and camera. I do not rename the image files. The folder structure gives me a mental tracking device for the images, and it insures that files do not get overlaid if two cameras happen to create images with the same name. This could happen because each camera manufacturer has its own in-camera naming schemes. If you own two Canon cameras or two Nikon cameras, it is possible that you will duplicate names across the two cameras. 2. Make backup copies (take offsite) Here is where things start to fall apart. I do make copies, but I do not make an offsite backup. Originally, my scheme was to copy images to my Mac and to an external hard drive, and do my work on the images on the internal drive. Later, I switched to doing work on the external drive because I needed portability for school work. As long as I had plenty of room on my internal drive, this worked fairly well as a backup location. Now (“Why am I still doing that?”), I keep bumping up against the limits of my internal drive. So, I started deleting old images off the internal drive, and then started moving them to another networked computer. Soon I will be bumping up against the limits of that computer’s storage. And it does not address the issue of having offsite backup. My other backup scheme is to keep the memory cards. While this has a number of flaws, it gives me a small measure of security. Is there a better way at this point? Of course there is. It requires some time, discipline, and newer technologies. Time and discipline to clean out the old baggage and get rid of lots of old very bad and useless images. As time goes on and I add new images, the older ones become increasingly unattractive. Next time, I will pick up with the following steps: 3. Review, rate, and keyword images 4. Discard the ‘rejects’ 5. Apply post-processing changes as required 6. Save and backup the ‘keepers’ In the meantime, Apple used to have “Mobile Me” - I never used that service, and I believe it has been discontinued. The point is, it provided a ‘cloud’ solution for backup. I think I am ready for the cloud, so if anyone has suggestions or favorites or places to avoid, please drop me a line and share your thoughts. ~ Joanne In previous posts about camera gear, I have mentioned different cameras that I own and some of the different ways that I use them. As the number and type of cameras have increased, and as the number, type, and purpose of the photographs themselves have increased, it has become more important to create and follow a disciplined work flow.
I am not saying that my work flow is the best; although it follows a certain logic, it is somewhat convoluted, embarrassingly lacking in the backup area, continually bumps up against the limits of my hardware, and probably has other flaws that will make themselves evident in an unhappy way at some point in the future. For now, it works for me; at least most of the time. My top Work Flow Characteristics include Discipline, Hardware, Software, Budget, Risk-Reward, Ease of Use, Adaptability, and Flexibility. This week’s post deals with Discipline. Future posts will cover the remaining characteristics, and any other ones I come up with between now and then. 1. Discipline - a system of rules governing conduct or activity (Webster’s Dictionary) The most important part of a work flow is to have one, and to follow it. In addition to the above, Webster’s Dictionary also defines discipline as an “orderly or prescribed conduct or pattern of behavior.” The best part is that you can make up your own rules, decide what is important to you, and find a balance between time, money, and security. There are risk/reward trade-offs in what rules you create for yourself, how closely you follow them, and how much time and money are you willing and able to invest. At a minimum, you should be aware of the risks of not having a workflow, or of having a workflow that does not adequately cover all essential elements. In the ideal world, the orderly pattern of behavior that makes up your work flow would include the timing of offloading images from your camera to your computer, location of primary and backup media, the timing of backups, file naming schemes, and tagging and cataloging of the images, as well as the processing of the images. For example, is your work load time-based or project-based or something else? Do you process images on a daily, weekly, or monthly basis? Or do you process them on a project basis, as photographic events conclude or as clients require? On a scale of 1 to 10, I think my work flow is about a 6. I give myself Plus Points for having a work flow and following it; but then there are Minus Points for not having it written down, for missing some key elements, and for being rather casual about timing issues. I actually follow multiple work flows, depending on the camera and the nature and purpose of the images. For example, iPhone images are the simplest and least risky. Mostly I use them for sharing on Facebook directly from my iPhone. Occasionally I will offload them to a uniquely named folder on my computer, and send them to friends via e-mail. If I lost any of them, it would not be a big deal. Sometimes I use iPhone apps for special effects. I have a couple of different apps including Instagram, Snapseed, and Photosynth, but the one I use the most is Camera+. Next up the scale of risk is my Lumix Point-and-Shoot. The images are relatively small JPEGs, around 3 - 5 MB. They are sometimes just for fun, or to capture something that is pretty or interesting. This is my ‘go to’ camera for Lions Club events, most Legion events, and other day-to-day activities. Because of its small size and unobtrusiveness, I have used this camera at family weddings and other gatherings. The Lumix uses the SD cards, which easily upload to my MacBook Pro via the built-in card reader slot. Other than tagging and rating in LightRoom, there is minimal or no post-processing of these. When I do make changes, it will be to correct exposure, do color balancing or to apply cropping. I use Picasa online for image sharing: these images have appeared in our club newsletters and magazines, on our display boards, in YouTube videos, and for sharing with friends and family. Occasionally I am asked to go back in my archives and produce images for special requests, but normally these images are in the low-risk category. The serious work flow issues come in to play with my DSLR cameras. The images are in my personal ‘high risk’ category - I would be very unhappy to lose these, so the backup considerations are more important. All of the other workflow characteristics that I mentioned above really come into play with these images, so I will use continue my thoughts in future blogs on work flow to illustrate how hardware, software, and other characteristics come into play. Ask any photographer why he or she wants/needs another camera and he or she will come up with a laundry list of reasons: bigger, faster, better, more features, easier to use, and other excuses. If all else fails, the reason is “just because.” In my case, it was all part of a larger plan to step up my game. As new camera models are released, older models come down in price. The timing was right for me to move up from my entry level Canon XTi to a professional model full-framed 5D Mark II. I wanted better resolution, especially in low-light situations. The gauges are larger and easier to read, both to see the settings and for playback mode. The video capability was enticing. I wanted more features, more power, more, more, more. And then the fun began. I was used to the buttons and dials on my old camera, now how do I make the new camera do the same things? Read manual, try pushing buttons and spin dials, read book, push different buttons and spin different dials; repeat as needed. The learning curve was a little steeper than I had anticipated. No buying this camera and dashing off for an important photo shoot the next day. My first glitch was when I took the camera outside in the sun for some test shots. Full manual settings, in-camera metering, and the images were coming out overexposed. To compensate, I was shooting underexposed by a full stop, letting in half the amount of light the camera indicated that I needed. Although that worked, it wasn’t the ‘right’ solution, and it was getting to be more annoying. Oh, did I neglect to mention that I bought the camera second-hand? It turns out that the previous owner had some unique settings and custom configurations. Once I set everything to the factory defaults, the exposure settings worked much better. 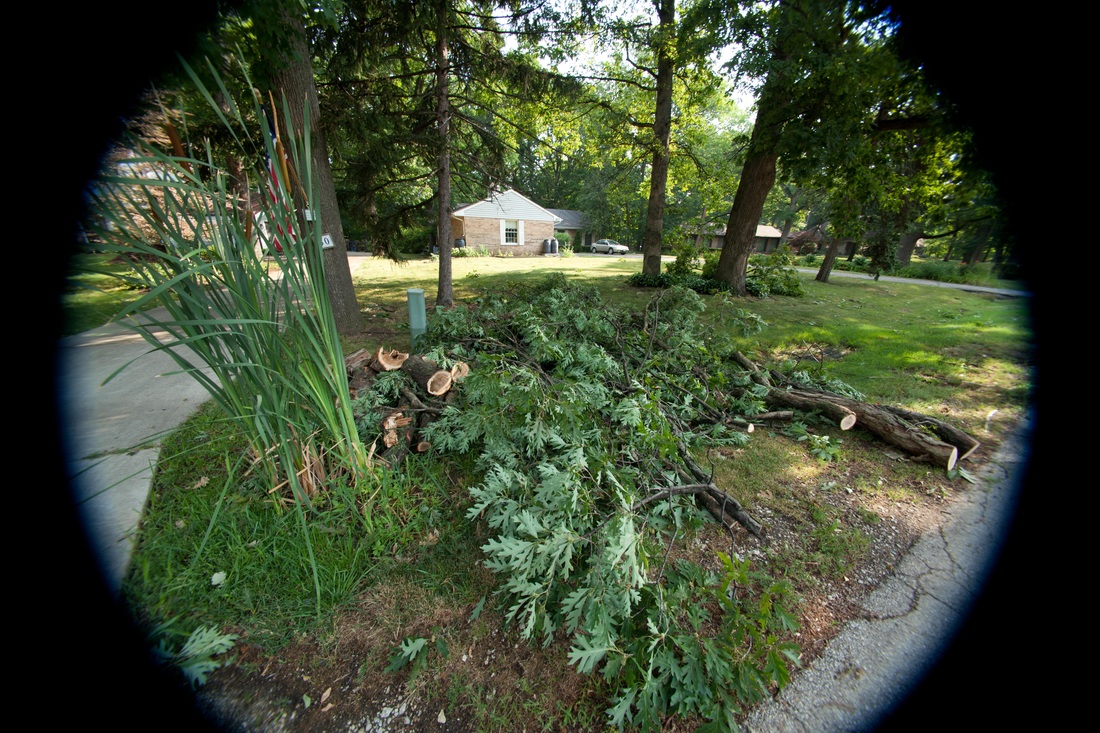 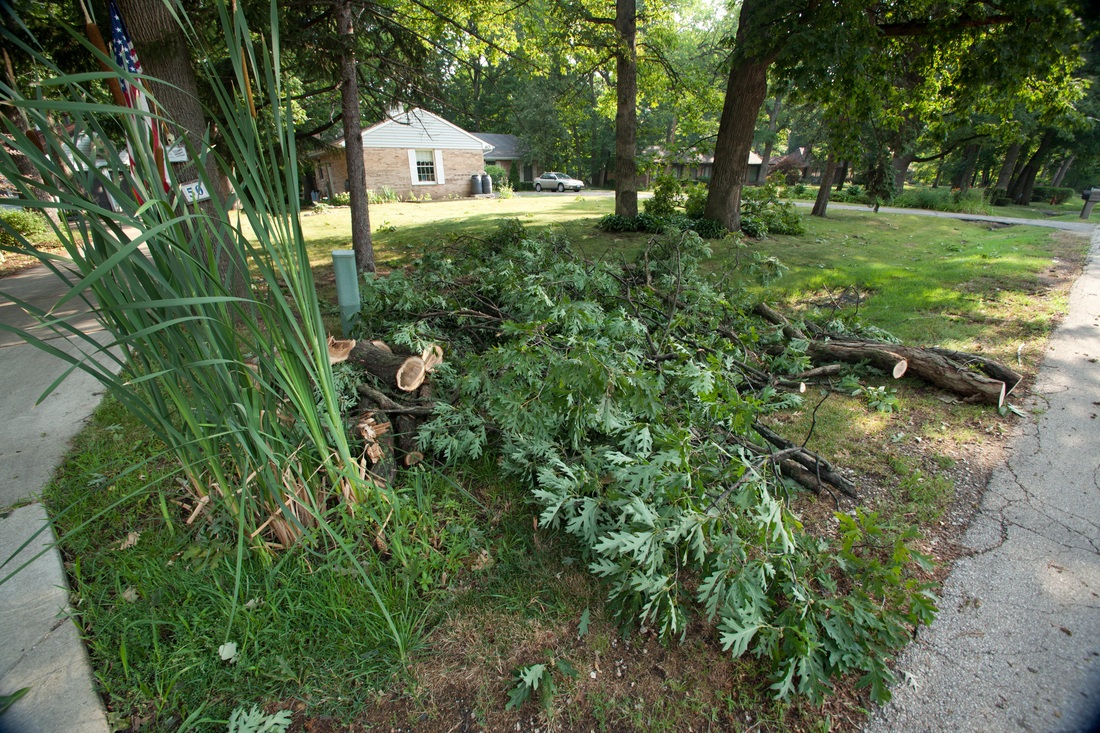 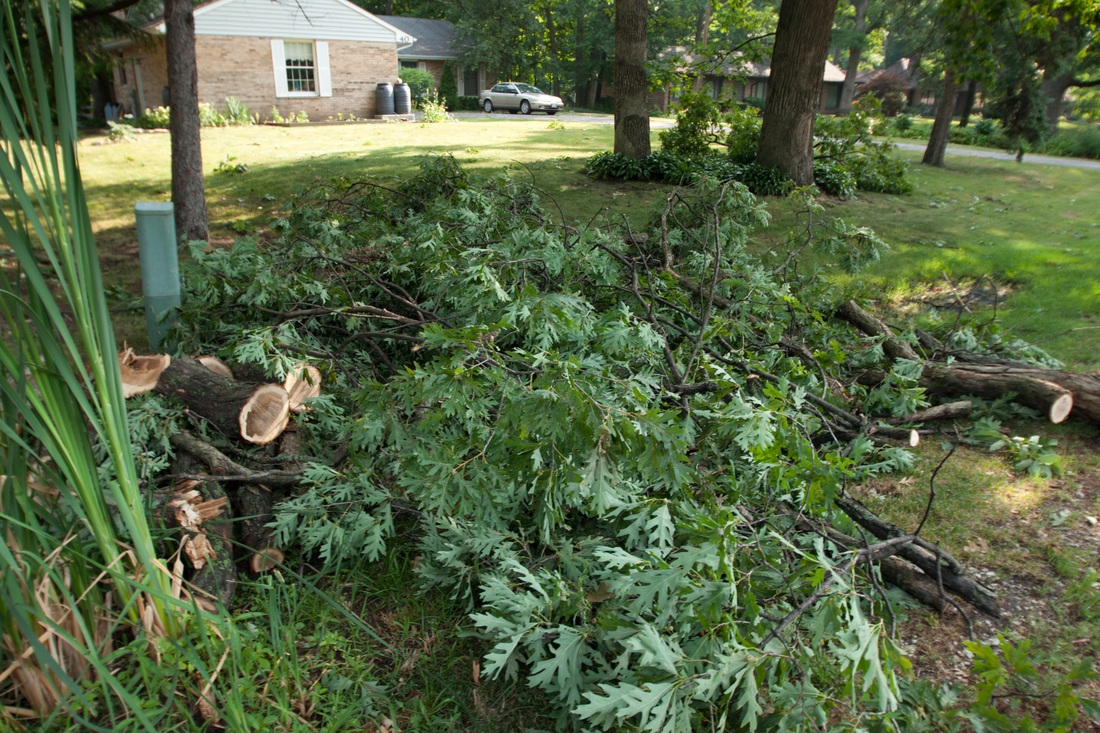 The second glitch is not so easily fixed: the lens situation. When I was buying lenses for my XTi, I was aware that there were different series of lenses, not all of which could be mounted on a full-frame camera. When I selected my wide-angle zoom (10-24mm) and my ‘go-to’ 18-200 zoom, I went with Tamron lenses. Good quality, lower prices. Unlike the ‘EFS’ lenses (think S for small), these are EF series lenses that are made to work on cameras with full-frame sensors. Great - I would be able to use these lenses on both my crop-sensor XTi and my full-frame sensor camera of the future.
Unfortunately, it didn’t work out that way. When I mounted these lenses on the new camera, there was significant vignetting that occurred at one end of the focal length range. The series of photos accompanying this blog were taken with the Tamron 10-24 mm wide-angle zoom lens, at focal lengths of 10mm, 14mm, and 24mm. The image itself shows what was left after a storm blew through yesterday and took a major branch off one of my oak trees. The vignetting appears at the most zoomed-out settings, between 10 mm and 15 mm on the wide-angle. So, my solutions are: a) shoot at whatever setting I need to get the image I want, then crop in post-production, b) don’t shoot at the ranges that produce vignetting, or c) replace them with Canon brand lenses. None of the solutions are optimum, but a) and b) will have to do for now. Could I have foreseen these issues? On the surface, everything looked good. A little more digging might have revealed what I now know. Sometimes it just boils down to not knowing what questions to ask, or the need to pay attention to terminology. For example, “will mount on...” is not the same as “fully functional with...” When I bought the lenses a couple of years ago, I knew there would be a full-frame camera in my future. I just didn’t know which one. Looking back, it would have been a good idea to ‘test drive’ the lens on any full-frame model that was available in-store; and yes, I bought in-store, not over the internet. New camera gear - a part of the learning equation that is the life of photography. I wouldn’t trade it for anything else. |

Archives
July 2020
|
 RSS Feed