|
Merriam-Webster defines “packrat” as “a person who collects or hoards especially unneeded items.” While I am nowhere near the category of people in that TV show where they have boxes piled to the ceiling, I do find it difficult to throw things out. I save magazines (I might just read that article some day when I have time), newspaper clippings (there are important points in there that I might need in the future, if I can ever find it again), childhood toys (teddy bear with one ear falling off, much loved critter with memories attached), and lots of other things. Whether we are talking about childhood mementos, photographic images, or an accumulation of ‘stuff,’ there is an emotional component that serves as a barrier to ridding ourselves of unnecessary baggage. Looking back to my early days with my MacBook Pro, I didn’t really need to worry about storage considerations; there was more than enough disk space to last a lifetime. That is no longer true. Almost every day I find myself bumping up against the limits of my internal hard drive. So, I am forced to be organized and disciplined. In a first step toward attaining the freedom of un-packratization (my new word), I am slowly working my way towards a kind of triage of photo-elimination. 1. Low-lying fruit This includes mis-fires, grey-card and other test shots, blurred images, and severely over or under exposed images. There is just no reason to save these, and what was I thinking in the first place? New images - gone. Older images - I will address in pieces as I get to them. The closer I get to filling my hard disk, the easier it is to find the time to identify and delete these. 2. Bad images Once the low-lying fruit is gone, the ‘bad’ images stand out a little more clearly. Of course, none of the images I am taking these days fit in this category. In other words, emotional distance is a requirement for weeding out the bad images. My solution is to start with the oldest group of images occupying real estate on my Mac. The hardest part about deleting images in this group is defining what is ‘bad.’ This is subjective, and could change from time to time. Certainly I expect my standards to change as I grow my skills as a photographer. This task becomes easier if the criteria are written down - you can always make modifications as you go along. For now, my general criteria include non-fixable flaws such as poor exposure, uninteresting subject matter, and dysfunctional composition. 3. Images that have outlived their usefulness This may be the hardest group to define, and the hardest group to eliminate. The main question to ask here is “Why do I still have this image, or this set of images?” Have I already printed them out, shared them with friends, put them in an album? Is there a sentimental reason to hang on to the digital images? If I cannot identify the people in the photo, if I don’t remember where or why I took it, if it doesn’t meet the test of stunningly beautiful/must share with the world; then why am I still hanging onto it? The hardest part about this category is that there is no crystal ball to tell us whether an image will meet some unspecified need in the future. Do I ever see myself re-working the images to achieve an artistic effect; or improve on other technical aspects? Does the image fit in with a theme or story that I would like to tell? This category requires discipline and critical decisions, perhaps gut-wrenching in some instances. Fortunately for me, I am still working on categories one and two, so I don’t have to address this one. Yet. I keep reminding myself that I am just removing them from the first level of access, which is my internal hard drive. I still have the image somewhere, on a backup device. Now if only I could remember what I did with that? A few final words of wisdom: Discarding rejects is best done in small doses. Like pruning bushes - don’t try to lob off all the branches at once. Take it easy, delete a few images, step back and return to the task another time. Here is an example of a category 3 candidate. The original image, taken in Alaska in 2009, is just a boring image of a piece of glacial ice But I felt it might be useful at some point in the future. The second image shows how I was able to use a boring shot as a building block for a composite. The polar bear and coca cola setup was taken in studio. In this case, I am happy I hung on to the boring image. 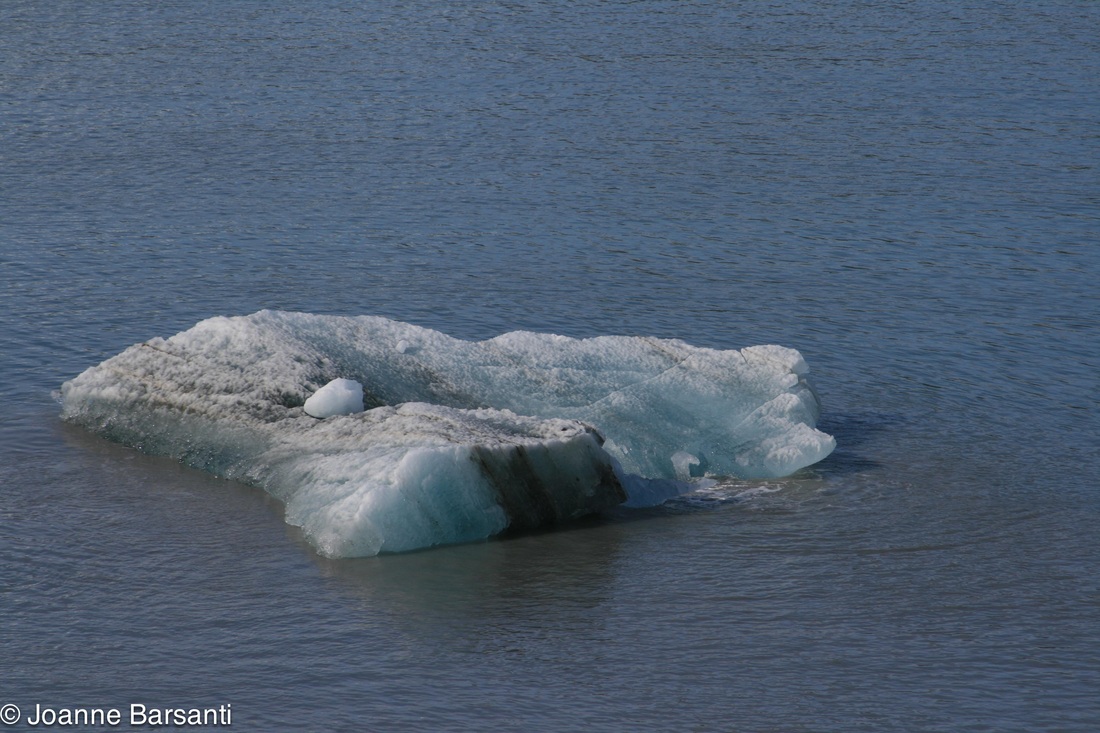 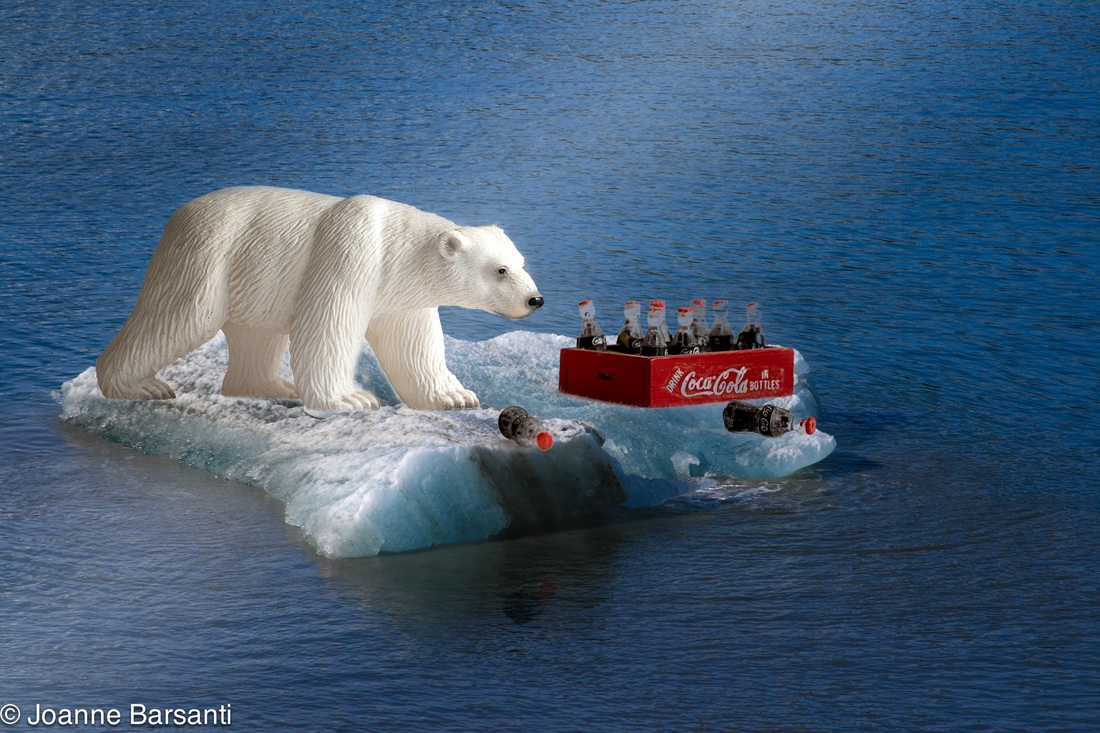
1 Comment
 Workflow: Organizing and Managing Images in Lightroom
Using file folders and naming conventions to keep track of images is a good start. In my July 17, 2012 blog post, I mentioned that I like to organize my images by year, month, and camera. That is just one way to think about storing images - hopefully I can remember that I went to Alaska in September of 2009, so that is the first place to look for images of mountains, glaciers, icy-blue waters, and certain types of wildlife. But what if I have images of mountains (or wildlife, flowers, architecture, etc) from other trips and I want to combine them into a collection of themed images? This is where software packages like Lightroom come into play. The accompanying screen shot of the Lightroom Library module illustrates the power of keyword tagging and rating, as well as a feature called Collections. Towards the middle of the screen on the right hand side, there is a list of all the keywords that have been assigned to the 10 images that are highlighted. An asterisk following a word means that one or more, but not all, of the images have been tagged with that keyword. In this example, the unifying words are wcproj and aroundtown. “Wcproj” stands for “West Chicago Project” a photo-documentary project covering a far west suburb of Chicago. West Chicago has a great history, and I purposefully captured a variety of images to illustrate how the suburb looks today. Each of the images may be used in one or more other collections, for example the water fountain could be combined with other images of water or with other images of fountains. Sometimes I use keywords as reminders of where I took the photo, such as on Washington Street or Turner Court. Assigning keywords helps me track locations, subject matter, themes, people, and other categories. Through keywords, I can easily filter a large number of images to pull out a narrow subset. Obviously, the better I am at applying keywords, the easier my job will be in the future to find and organize images that meet my filter criteria. If I neglected to tag images with keywords “sky” or “clouds,” then they will not show up in my search for images with clouds or sky. Using filters is a great way to find images, but it is temporary. The Smart Collections feature provides a way to make the filter permanent, at least until you change it. Going back to the screen print, towards the middle of the left hand side you will see a section called Collections, with the first entry underneath it called Smart Collections. The full hierarchy of Collections, not shown in the screen shot, looks something like this: Smart Collections Smart Collection Set 1 Smart Collection subset 1 image 1 image 2 etc. Smart Collection subset 2 etc. Smart Collection Set 2 etc. Collection 1 Collection 2 etc. where you assign your own name to the collection set, collections, and collection subsets. Back to Smart Collections... “WC Proj Set” is just a name, a virtual folder for holding one or more actual collections. I have about a dozen such smart collections in the WC Proj set. Some of the images, because of the keyword assignment, may appear in more than one smart collection. This is okay and intentional. Examples When I created this smart collection, I assigned it to the WC Proj Set. Then I added the following filter criteria:
Similarly, the smart collection “WCProj around town” was built using the following filter criteria:
Currently, there are 43 images in the “WCProj St Mary’s Church” Smart Collection and 10 images in the “WCProj Around Town” Smart Collection. This is probably a good time to mention that the West Chicago Photo Documentary project was organized by the College of DuPage Photography Department, and has been going on for several years. There are quite a few COD students and alumni involved in the project. Typically, each photographer selects the areas and subject matter to photograph, and then concentrates on one theme. I selected churches as my theme, with emphasis on St Mary’s church and congregation. Collections vs Smart Collections The Smart Collections are dynamic, subject to change based on the rules you specify and the addition or removal of attributes from images in the catalog. As you add images to the catalog and tag them with attributes or keywords, they are candidates for automatically being added to a smart collection. You can change the criteria for a smart collection, and that will either increase or decrease the number of images that appear in that collection. The collections are ‘smart’ because the system automatically adjusts the contents of the smart collections based upon the criteria you specify and the attributes of your images in the catalog. You, the Lightroom owner, control what is in regular (some people call them ‘dumb’) Collections by simply dragging and dropping to add images or by deleting images from the collection. When images are deleted from a Collection (smart or otherwise), they are still in Lightroom, still in your Library, still on your storage media. They just no longer show up in that Lightroom collection. There is another collection, called Quick Collections, found under the Catalog panel. This is useful as a work area, to try out selections of images. You can drag and drop an image to the Quick Collections folder, or you can click on the little circle that appears in the upper right corner when your cursor hovers over an image. A few other factoids about collections:
This just scratches the surface. There are plenty of tutorials on the internet about Lightroom Collections. Also, there is no substitute for just getting the product and trying it out. I use Lightroom 3, and all of my comments pertain to that version. Lightroom 4 is the most current version, and it is possible that some aspects of managing and organizing images have been changed. Before continuing on about post-processing activities, I want to make a distinction between JPEG images and Raw images. The smartphone cameras and point-and-shoots typically generate images in JPEG (Joint Photographic Experts Group) format, an industry-wide standard that compresses the data, thereby reducing file size (good) but also reducing overall image quality (not so good). Without getting too technical, when you select the JPEG format in your camera, the camera makes decisions about how the image should look, including color saturation, white balance, contrast and sharpening. For everyday photos, sharing with family and friends, this is usually acceptable. The problem is that those decisions cannot be undone because certain data is thrown away. If you like to have control over your images, Raw is the way to go. Some point and shoots have the ability to capture in Raw format. As far as I know, all DSLR’s can capture in Raw. Each manufacturer has its own format. You can tell what brand of camera was used to take an image just by the file extension. For example, Canon uses .CR2; Nikon uses .NEF; Panasonic uses .RW2, and so on. The first time I shot in Raw, I chose the option JPEG+Raw, meaning that each image would be saved in two versions. That way, I would have the best of both worlds. To my surprise, when I looked at the set of images, the JPEG images looked better than the Raw. That is because the camera had already made the adjustments mentioned above to the JPEG version. It was up to me to make the adjustments to the Raw image, according to my style and vision. There are Raw Converters (software) specific to each manufacturer, but I prefer to use Adobe’s Lightroom software, once I have imported, tagged, and rated the images. The same functionality is included in Photoshop as Adobe Camera Raw (ACR), with a slightly different user interface. To help illustrate the difference between JPEG and Raw, the following two images were taken from a single shot with the JPEG+Raw setting turned on. The camera was a Canon Rebel XTi. The original file size of the JPEG (on the left) was 3.8 MB, and the file size of the Raw image on the right was 12.3 MB. I brought each image into Photoshop and made a small selection in roughly the same area of each image. I did not make any adjustments to either image.   Photographers make conscious decisions about whether to shoot in JPEG or Raw, and those decisions may vary depending upon the circumstances and intended use for the images. Typically it comes down to speed (JPEG is faster), file size (JPEG is smaller), quality, and flexibility in post-processing (Raw provides more control, more flexibility, and more options). For comparison purposes, most cameras record up to 4,096 levels of color in each channel, whereas a JPEG file has been reduced down to 256. Think of it in terms of Crayola crayons. They come in boxes of 8, 16, 24, 48, 64, 96, and 120. Which one would YOU rather have?
Picking up where I left off last week, and now that the images are in their respective work folders, it is time to start reviewing, rating, and applying keywords. My favorite program for this is Lightroom, by Adobe. It does a whole lot more, but even if it didn’t, it would be well worth the price tag. One of these days I will upgrade to Lightroom 4, but for now Lightroom 3 is more than sufficient.
As I import groups of images, especially if the images are from the same event or location, or if they have the same subject matter, I will enter keywords that will apply to most or all of the images to be imported. Even if there are differences, it is easier to apply the keywords globally to the batch being imported, and then go back and edit the few that are different. In addition to the location, an event, project name, I will sometimes enter the person’s name or an attribute of the image, such as color or style (panoramic, HDR, texture and others). Lightroom keeps track of keywords that you have used in the past, so it is easy to apply them to new images. Once import is complete, I use the grid view in Library to quickly scan and rate the batch of images that I just imported. On the first pass, the rating is either one star, no stars, or flag as a reject. Rejects are obvious things like severe under or overexposure, blurred images, flash didn’t fire, or some other reason that the image will never be usable. Once the first pass is complete, I will filter to show only the 1-stars. Then I will go through those and select ones I really like, and bump them up to 2-stars. I used to go through this multiple times until I got to 5-stars; but now I am more picky, and usually 2-stars indicates ones for further work. An exceptional image might get 3-stars. The only drawback is that now I have to remember that a 5-star from a couple of years ago is equivalent to a 3-star rating for more current images. Lightroom also lets you color-code images or groups of images, or set a white flag to keep the image or note it for the future. I mentioned earlier that there are some holes in my system, and the area of ‘rejects’ is one of them. Although I mark some images as rejects, I normally don’t take the next step and actually tell Lightroom to delete them. I realize that this is like organizing your closet, putting all the clothes that are no longer needed in a separate pile, but then not going the final step of throwing them out or donating them to one of the many charities out there. They are still there, and I might change my mind... There are other excuses, but they start breaking down when space gets tight. Space limitations and the resultant system degradation are powerful motivators for reviewing old images and getting rid of ones that you now realize will never be used. Lightroom has many powerful features that I have not touched on here, including organizing, managing, and editing images. It also has its downside(s), and is not for everyone. In future blog posts, I will touch on those points and more as I continue exploring issues related to workflow. ~ Joanne Last week I talked about different styles of work flow depending on the camera and purpose of the images. Where my iPhone and Point-and-Shoot images are concerned, ‘Work flow for Fun’ rules the day: simple, low-risk, minimal post-processing. The goal is to get the images out there where they can be shared, and move on to the next thing. If the images get lost or deleted afterwards, it is no big deal. They have served their purpose. Sometimes I am asked to retrieve an image or a series, but that doesn’t happen often. Yes, I still save these images, but if they were lost, it would not be a big deal.
It is a different story with my ‘serious’ work - all the elements of work flow come into play when it comes to images produced on my DSLRs. The images are much larger, there is more post-processing, and the risk-reward dynamics of losing something become more significant. I may never go back to images that I took two or three years ago, but I still want the comfort of knowing they are there and that I can find and retrieve them easily. In theory, a work flow should look something like this:
I follow most of those steps, and for the ones that I don’t follow, I am keenly aware of the risks. After putting down my thoughts, I will be re-visiting the areas that are lacking, and coming up with new ways to fill in those gaps. As I examine my workflow, I find myself asking the questions “Why am I (still) doing that?” or “Why am I NOT doing something?” and “Is there a better way at this point?” In practice, here is what my workflow looks like: 1. Download images from camera Since I use a MAC (MacBook Pro) and I like to have control, I use the Finder Utility to drag and drop from the memory card to computer. I have folders set up by year, month, and camera. I do not rename the image files. The folder structure gives me a mental tracking device for the images, and it insures that files do not get overlaid if two cameras happen to create images with the same name. This could happen because each camera manufacturer has its own in-camera naming schemes. If you own two Canon cameras or two Nikon cameras, it is possible that you will duplicate names across the two cameras. 2. Make backup copies (take offsite) Here is where things start to fall apart. I do make copies, but I do not make an offsite backup. Originally, my scheme was to copy images to my Mac and to an external hard drive, and do my work on the images on the internal drive. Later, I switched to doing work on the external drive because I needed portability for school work. As long as I had plenty of room on my internal drive, this worked fairly well as a backup location. Now (“Why am I still doing that?”), I keep bumping up against the limits of my internal drive. So, I started deleting old images off the internal drive, and then started moving them to another networked computer. Soon I will be bumping up against the limits of that computer’s storage. And it does not address the issue of having offsite backup. My other backup scheme is to keep the memory cards. While this has a number of flaws, it gives me a small measure of security. Is there a better way at this point? Of course there is. It requires some time, discipline, and newer technologies. Time and discipline to clean out the old baggage and get rid of lots of old very bad and useless images. As time goes on and I add new images, the older ones become increasingly unattractive. Next time, I will pick up with the following steps: 3. Review, rate, and keyword images 4. Discard the ‘rejects’ 5. Apply post-processing changes as required 6. Save and backup the ‘keepers’ In the meantime, Apple used to have “Mobile Me” - I never used that service, and I believe it has been discontinued. The point is, it provided a ‘cloud’ solution for backup. I think I am ready for the cloud, so if anyone has suggestions or favorites or places to avoid, please drop me a line and share your thoughts. ~ Joanne |

Archives
July 2020
|
 RSS Feed