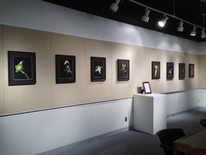
 I am pleased and honored to be participating in several Photography Exhibits this spring. Each has its own ‘flavor’ and there will be Artist(s) Receptions. I would love to see my friends and followers at any one of these shows. Here are the details: 1. My Solo Exhibit “Flowers with Attitude” is currently on display at The Photo-Four Gallery, located on the South Suburban College Campus, 15800 South State Street, South Holland, IL. The Artist’s Reception is on the closing date, Tuesday, March 26 at 12:30. 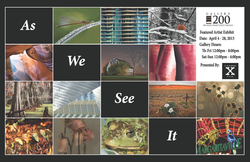 2. “As We See It”, the collective vision of the College of DuPage Photo Ex Club (www.facebook.com/photoexclub), will be the “Featured Artist” exhibit at Gallery 200 at 200 Main Street in West Chicago from April 4 through April 28. This collection features over fifty current works of fourteen students, former students, and COD residents.
Opening Reception is on Friday, April 5 from 6 - 9 pm. 3. The fotoMuses (www.fotoMuses.com) are currently working on their upcoming exhibit “The Individual Photograph.” This exhibit of approximately fifty images will be on display from May 11 through June 22 at the Bloomingdale Park District Museum. The Museum is located at 108 S. Bloomingdale Road in Blooomingdale, IL. The Artists Reception will be on Sunday, May 19 from 2 - 4 pm. I am proud to be part of these three very different exhibits, each with a unique theme, each showcasing the photography of my friends and colleagues as well as my own works.
1 Comment
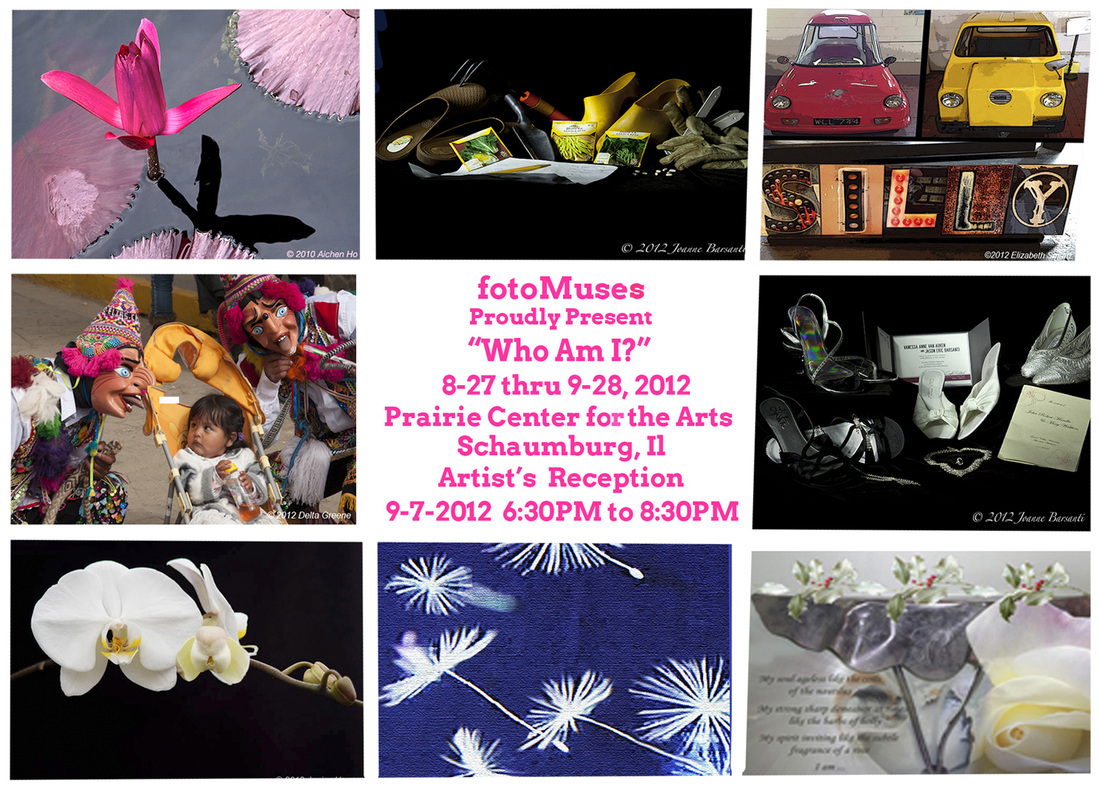 September promises to be a very busy month in my world of Photography. I invite you to join me in one or all of the following events that are scheduled for this month: 1. Friday, September 7, 6:30 - 8:30 pm. Complimentary Artist’s Reception at the Herb Aigner Gallery in the Schaumburg Prairie Center for the Arts. Join me and my fellow fotoMuses for our latest exhibit “Who Am I?” As a group, we share a passion for photography, and the desire to share our knowledge and experiences with ourselves and others. The “Who Am I?” theme is a great vehicle for showcasing our differences: how we view ourselves, and how we interpret that vision through the medium of photography. For more about the fotoMuses, see http://www.fotomuses.com/ The exhibit runs through September 28. The center is open to the public Monday through Friday from 8:00 am to 6:00 pm, and on many evenings and weekends. For directions to the exhibit location, see http://www.ci.schaumburg.il.us/PCA/PrairieCenter/Pages/PCAMap.aspx  2. Saturday and Sunday, September 15 & 16, 10:00 am to 5:00 pm. The 57th Annual Park Forest Art Fair in downtown Park Forest. Although I have participated in previous art fairs as a member of the College of DuPage’s Photo Ex group, this is my first solo venture into the world of Art Fairs. Organized by the Tall Grass Arts Association, The Park Forest Art Fair is the second oldest juried Art Fair in the Chicagoland area. The Fair also features musical entertainment on both days, lots of activities for children, a variety of food vendors, and wine tastings. The Tall Grass Arts Gallery will be open throughout the festival. Both the Gallery and the Art Fair are open to the public and free of charge. Look for me in Booth #67, on the Village Green (grassy area) - I would love for you to stop by and say hello. Before you leave, check out the Gallery’s Luminosity exhibit. (Yes, I have an image on display in the main gallery area.) 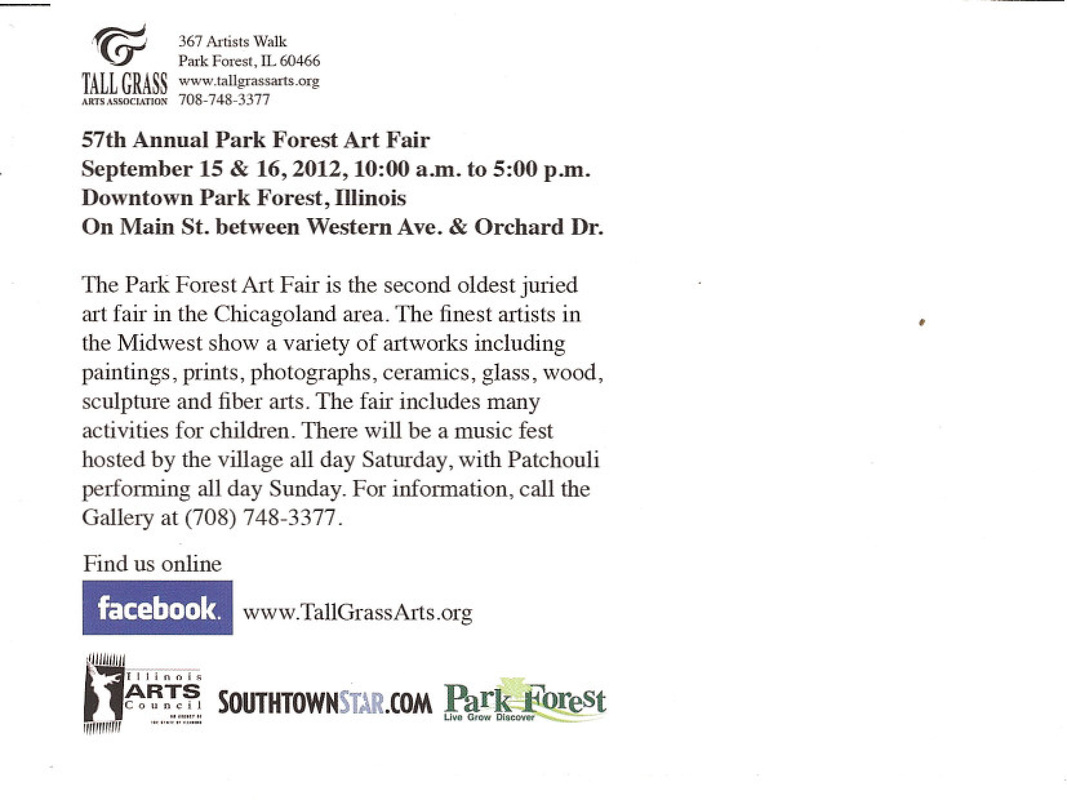 For more about the Tall Grass Arts Association and the Park Forest Art Fair,
see http://www.tallgrassarts.org/Park-Forest-Art-Fair.html Getting there: Park Forest is about an hour’s drive from the Roselle/Schaumburg area, and a much easier drive than going into downtown Chicago. The art fair is located on Main Street in Park Forest between Western Avenue and Orchard Drive. http://www.mapquest.com/maps?address=367%20Artists%20Walk&city=Park%20Forest&state=IL&zipcode=60466 3. Sunday, September 23, 2:00 - 4:00 pm. Complimentary Artists Reception at Bloomingdale Park District Museum. Exhibit Theme: “Keep It Simple” I am pleased to have three entries accepted into this juried exhibit, including my first foray into the world of mixed media. I will also have matted, unframed images in the ‘bin.’ All are available for sale, with the exception of my experimental piece “Sand Runes II.” As usual, the reception will provide refreshments, musical entertainment, and the opportunity to meet and chat with the artists. The Park District Museum is located at 108 S. Bloomingdale Road (one block south of Lake Street). For more information about the Museum, see http://www.bloomingdaleparks.org/Facilities/BPD-museum/BPD-museum.htm “Keep It Simple” will be on display from September 15 through October 20. Museum hours are Wednesday 4 - 8 pm, Thursday and Friday 10 am - 4 pm, and Saturday 12 - 4 pm. Of course there are many more photographic and artistic events going on in the Chicagoland area this month, but these are the ones that I will be participating in. Hope to see you there! 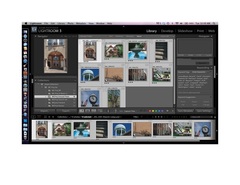 Workflow: Organizing and Managing Images in Lightroom
Using file folders and naming conventions to keep track of images is a good start. In my July 17, 2012 blog post, I mentioned that I like to organize my images by year, month, and camera. That is just one way to think about storing images - hopefully I can remember that I went to Alaska in September of 2009, so that is the first place to look for images of mountains, glaciers, icy-blue waters, and certain types of wildlife. But what if I have images of mountains (or wildlife, flowers, architecture, etc) from other trips and I want to combine them into a collection of themed images? This is where software packages like Lightroom come into play. The accompanying screen shot of the Lightroom Library module illustrates the power of keyword tagging and rating, as well as a feature called Collections. Towards the middle of the screen on the right hand side, there is a list of all the keywords that have been assigned to the 10 images that are highlighted. An asterisk following a word means that one or more, but not all, of the images have been tagged with that keyword. In this example, the unifying words are wcproj and aroundtown. “Wcproj” stands for “West Chicago Project” a photo-documentary project covering a far west suburb of Chicago. West Chicago has a great history, and I purposefully captured a variety of images to illustrate how the suburb looks today. Each of the images may be used in one or more other collections, for example the water fountain could be combined with other images of water or with other images of fountains. Sometimes I use keywords as reminders of where I took the photo, such as on Washington Street or Turner Court. Assigning keywords helps me track locations, subject matter, themes, people, and other categories. Through keywords, I can easily filter a large number of images to pull out a narrow subset. Obviously, the better I am at applying keywords, the easier my job will be in the future to find and organize images that meet my filter criteria. If I neglected to tag images with keywords “sky” or “clouds,” then they will not show up in my search for images with clouds or sky. Using filters is a great way to find images, but it is temporary. The Smart Collections feature provides a way to make the filter permanent, at least until you change it. Going back to the screen print, towards the middle of the left hand side you will see a section called Collections, with the first entry underneath it called Smart Collections. The full hierarchy of Collections, not shown in the screen shot, looks something like this: Smart Collections Smart Collection Set 1 Smart Collection subset 1 image 1 image 2 etc. Smart Collection subset 2 etc. Smart Collection Set 2 etc. Collection 1 Collection 2 etc. where you assign your own name to the collection set, collections, and collection subsets. Back to Smart Collections... “WC Proj Set” is just a name, a virtual folder for holding one or more actual collections. I have about a dozen such smart collections in the WC Proj set. Some of the images, because of the keyword assignment, may appear in more than one smart collection. This is okay and intentional. Examples When I created this smart collection, I assigned it to the WC Proj Set. Then I added the following filter criteria:
Similarly, the smart collection “WCProj around town” was built using the following filter criteria:
Currently, there are 43 images in the “WCProj St Mary’s Church” Smart Collection and 10 images in the “WCProj Around Town” Smart Collection. This is probably a good time to mention that the West Chicago Photo Documentary project was organized by the College of DuPage Photography Department, and has been going on for several years. There are quite a few COD students and alumni involved in the project. Typically, each photographer selects the areas and subject matter to photograph, and then concentrates on one theme. I selected churches as my theme, with emphasis on St Mary’s church and congregation. Collections vs Smart Collections The Smart Collections are dynamic, subject to change based on the rules you specify and the addition or removal of attributes from images in the catalog. As you add images to the catalog and tag them with attributes or keywords, they are candidates for automatically being added to a smart collection. You can change the criteria for a smart collection, and that will either increase or decrease the number of images that appear in that collection. The collections are ‘smart’ because the system automatically adjusts the contents of the smart collections based upon the criteria you specify and the attributes of your images in the catalog. You, the Lightroom owner, control what is in regular (some people call them ‘dumb’) Collections by simply dragging and dropping to add images or by deleting images from the collection. When images are deleted from a Collection (smart or otherwise), they are still in Lightroom, still in your Library, still on your storage media. They just no longer show up in that Lightroom collection. There is another collection, called Quick Collections, found under the Catalog panel. This is useful as a work area, to try out selections of images. You can drag and drop an image to the Quick Collections folder, or you can click on the little circle that appears in the upper right corner when your cursor hovers over an image. A few other factoids about collections:
This just scratches the surface. There are plenty of tutorials on the internet about Lightroom Collections. Also, there is no substitute for just getting the product and trying it out. I use Lightroom 3, and all of my comments pertain to that version. Lightroom 4 is the most current version, and it is possible that some aspects of managing and organizing images have been changed. 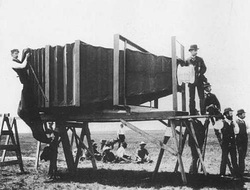 In my second of a series on camera gear, it is time to talk about my “big cameras.” There are some really large cameras out there, like the one shown here, which was created by George R. Lawrence in 1900. But for me, a “big camera” refers to a 35mm DSLR (Digital Single Lens Reflex). Since everything is relative, this size is compared to my point and shoot and smart phone camera.
My introduction to the DSLR world was a Canon EOS Rebel XTi, also known as a 400D. Just as a side bar, I have never understood the Canon numbering system. You would think that the bigger the number, the larger and more sophisticated the camera. But that is not the case - the XTi (400D) is Canon’s entry level DSLR, a relatively low-priced, light-weight, crop-sensor digital camera with a fairly simple to use dial for the manual and semi-manual modes. For the first four years, I used the fully automatic mode for 99% of my shots. I probably experimented with Aperture Priority mode a few times, but it was mostly the little green square of the Auto Mode that caught my fancy. I had no idea about f-stops or the relation between aperture, shutter speed and ISO. I really didn’t care; I was just happy to have pictures that came out looking relatively decent, and I was happy to have the camera figure that out for me. Then my local high school had a class in photography, just enough to whet my appetite. Before I knew it, I was hooked, and started taking classes at the local community college, COD (College of DuPage). The instructors wanted us to shoot in manual mode, so I learned how to do that. They wanted us to shoot in RAW format, so I switched from JPEG to JPEG+RAW and finally to RAW, with a few glitches encountered along the way. I discovered that I liked having full control over all those combinations that had so mystified me before. The XTi is relatively easy to use, and so it became second nature to spin the dial to get the right shutter speed or push in what I call the ‘alt’ button and spin the dial to change the aperture setting. I learned how to blur the background, otherwise known as shallow depth of field. I figured out how to take group shots and include myself in them. I learned how to selectively focus, and how to use many other features and techniques to achieve the exact effect I was looking for. Even after several years with my XTi, I am still learning new things about it, still going back to my dog-eared manual to see what other capabilities it has. After six years with this camera, there are many settings that I have never used and may never use; and there are some features and instructions that still mystify me. So, my DSLR is my camera of choice for “serious” work, for my personal projects, for class work, for images I exhibit and hope to sell. The point and shoot and cellphone cameras are for everyday and documentary shots that may live their life on my computer, or may find their way to social media, newsletters, and other means of sharing captured experiences with friends. For comparison purposes, the XTi is a 10 megapixel camera. Actual file sizes vary, but my RAW images normally range between 8 and 9 MB, and are in a 3:2 aspect ratio, with dimensions of 3888 x 2592 pixels. I am happy with the print quality for both 8x10 and 11x14 inch prints. On a couple of occasions, I have made large-sized canvas prints, and been happy with the results. The Lumix DMC-ZS3 is a 10 megapixel point-and-shoot camera that can take images in either a 3:2 or 4:3 aspect ratio. I use the 4:3 aspect ratio, and the JPEG file sizes are generally between 3 and 5MB, with dimensions of 3684 x 2736 pixels. The camera on the iPhone 4S is an 8 megapixel camera. I have printed exhibition quality images as large as 11x14 inches. Most of my iPhone and point-and-shoot images are used for sharing and social media, and are quite suitable for internet use as well as print in newsletters. Next time: limitations of the XTi, and moving up to the next level.  Second Story View, © 2012 Joanne Barsanti I am very excited to be part of the Love Apple Exhibit, which opens tonight at the 33Contemporary Gallery, located in the Zhou B Art Center at 1029 W 35th Street in Chicago.
Fellow College of DuPage (COD) student Christine Carroll and I were featured in The College of DuPage Photo Program Blog, Silicon & Silver, which also included our images. The exhibit, which runs through March 10, celebrates the innovation of Apple, Inc. and its late leader Steve Jobs. All of the art for this exhibit was created or manipulated using Apple hardware or software. |

Archives
July 2020
|
 RSS Feed