|
Before continuing on about post-processing activities, I want to make a distinction between JPEG images and Raw images. The smartphone cameras and point-and-shoots typically generate images in JPEG (Joint Photographic Experts Group) format, an industry-wide standard that compresses the data, thereby reducing file size (good) but also reducing overall image quality (not so good). Without getting too technical, when you select the JPEG format in your camera, the camera makes decisions about how the image should look, including color saturation, white balance, contrast and sharpening. For everyday photos, sharing with family and friends, this is usually acceptable. The problem is that those decisions cannot be undone because certain data is thrown away. If you like to have control over your images, Raw is the way to go. Some point and shoots have the ability to capture in Raw format. As far as I know, all DSLR’s can capture in Raw. Each manufacturer has its own format. You can tell what brand of camera was used to take an image just by the file extension. For example, Canon uses .CR2; Nikon uses .NEF; Panasonic uses .RW2, and so on. The first time I shot in Raw, I chose the option JPEG+Raw, meaning that each image would be saved in two versions. That way, I would have the best of both worlds. To my surprise, when I looked at the set of images, the JPEG images looked better than the Raw. That is because the camera had already made the adjustments mentioned above to the JPEG version. It was up to me to make the adjustments to the Raw image, according to my style and vision. There are Raw Converters (software) specific to each manufacturer, but I prefer to use Adobe’s Lightroom software, once I have imported, tagged, and rated the images. The same functionality is included in Photoshop as Adobe Camera Raw (ACR), with a slightly different user interface. To help illustrate the difference between JPEG and Raw, the following two images were taken from a single shot with the JPEG+Raw setting turned on. The camera was a Canon Rebel XTi. The original file size of the JPEG (on the left) was 3.8 MB, and the file size of the Raw image on the right was 12.3 MB. I brought each image into Photoshop and made a small selection in roughly the same area of each image. I did not make any adjustments to either image. 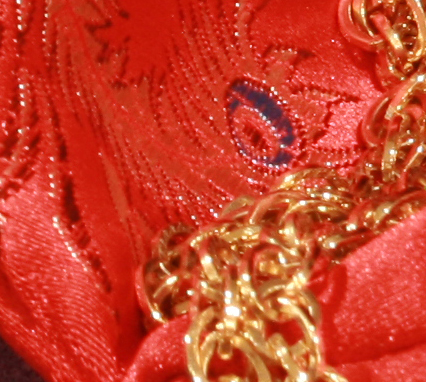 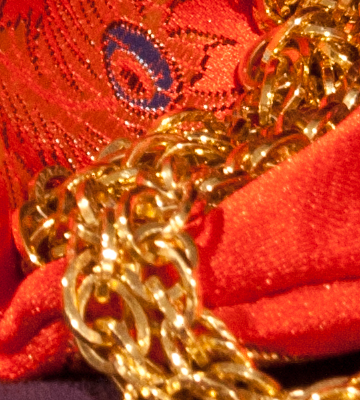 Photographers make conscious decisions about whether to shoot in JPEG or Raw, and those decisions may vary depending upon the circumstances and intended use for the images. Typically it comes down to speed (JPEG is faster), file size (JPEG is smaller), quality, and flexibility in post-processing (Raw provides more control, more flexibility, and more options). For comparison purposes, most cameras record up to 4,096 levels of color in each channel, whereas a JPEG file has been reduced down to 256. Think of it in terms of Crayola crayons. They come in boxes of 8, 16, 24, 48, 64, 96, and 120. Which one would YOU rather have?
1 Comment
Debbie poulin
8/1/2012 12:19:09 am
Your description of these "technical" photo terms is so clear and easy to understand and the visuals are great as well. You should write a book. Your comment will be posted after it is approved.
Leave a Reply. |

Archives
July 2020
|
 RSS Feed